
There’s something special about biting into a freshly baked loaf of Italian bread. The crunch of the crust and the soft interior are a joy. Baking is not just about the end product but also the journey – mixing, kneading, and waiting. In this article, we’ll show you how to make a delicious artisan loaf from scratch.
Our easy bread recipes will guide you through each step. From preparing the dough to getting that perfect crust, it’s simple. With just a few ingredients and patience, you’ll make a beautiful loaf that will impress. Join us on this culinary adventure and share your experiences!
Key Takeaways
- Learn how to make a delicious loaf from scratch
- Discover the secrets to achieving the perfect crust
- Explore the benefits of baking your own bread at home
- Get tips on preparing the dough for the best results
- Find out how to customize your loaf to suit your taste
The Magic of Homemade Ciabatta Bread
Biting into a freshly baked ciabatta loaf is magical. It’s more than just eating; it’s a tradition passed down through generations. Homemade ciabatta fills your home with the smell of fresh bread, brings joy from creating, and is a pleasure to share with others.
What Makes Ciabatta Special
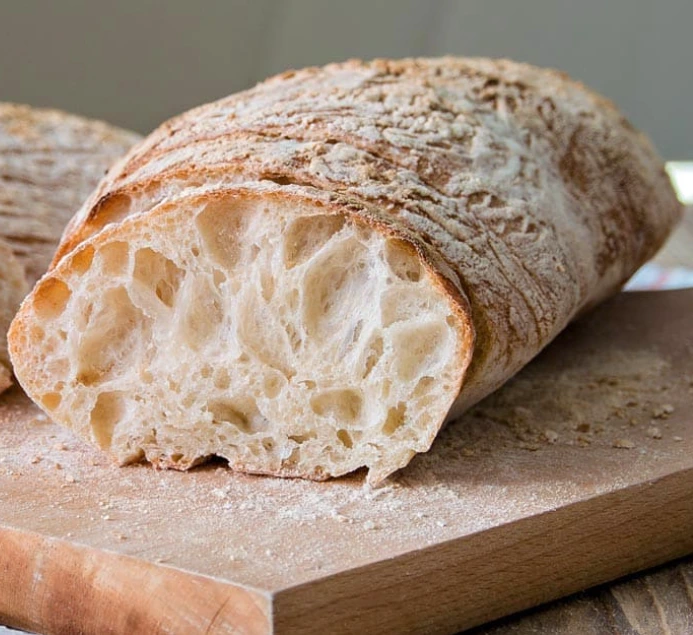
Ciabatta is loved for its airy texture and crispy crust. Its unique texture comes from special dough hydration and a longer fermentation. This makes it light and perfect for sandwiches or with soups and salads.
Making ciabatta starts with a pre-ferment called biga. This step is key for its taste and texture.
The Rewards of Baking Your Own Bread
Baking your own bread is rewarding. You control the ingredients, making it healthier without preservatives. You also enjoy the creation process, from watching the dough rise to seeing it become a beautiful loaf.
Plus, you can customize your bread. Add herbs, cheese, or nuts to make it your own. Ciabatta dough is versatile, offering endless creative options.
| Benefits of Homemade Ciabatta | Description |
|---|---|
| Control Over Ingredients | Allows for healthier options by avoiding preservatives and additives. |
| Customization | Enables you to add your preferred flavors and ingredients. |
| Sense of Accomplishment | Watching your dough rise and bake into a beautiful loaf is rewarding. |
A Brief History of Ciabatta: Italy’s Beloved Bread
Ciabatta’s story starts in Northern Italy, where it was first made. It’s called “slipper” in Italian because of its shape. The bread has a long form and slightly curled ends.
Origins in Northern Italy
In the 1980s, ciabatta was created as a response to French baguettes’ popularity in Italy. Bakers in the Veneto region, especially around Verona and Vicenza, made this bread. They used a natural starter and a longer fermentation process.
This gave ciabatta its unique texture and flavor.
How Ciabatta Became an International Favorite
Ciabatta’s fame grew and it became a staple in Italian bread making worldwide. Its airy holes and rustic crust won over many. Today, it’s loved globally, with bakers trying new ingredients while keeping its essence.
Exploring ciabatta’s history shows its success is in its simplicity and quality ingredients. Whether you’re following a traditional ciabatta bread recipe or trying new flavors, knowing its roots is key to enjoying this beloved bread.
Essential Equipment for Perfect Ciabatta
Baking ciabatta like a pro needs more than a good recipe. You also need the right equipment. To get that perfect loaf, you’ll need some essential tools and nice-to-have accessories.
Must-Have Tools
First, you’ll need a few key pieces of equipment. These include:
- Digital Kitchen Scale: Accurate measurements are crucial in bread making.
- Stand Mixer or Bread Machine: These help in mixing and kneading the dough.
- Baking Stone or Dutch Oven: These tools are essential for achieving the perfect crust.
| Tool | Purpose |
|---|---|
| Digital Kitchen Scale | Accurate ingredient measurement |
| Stand Mixer or Bread Machine | Dough mixing and kneading |
| Baking Stone or Dutch Oven | Achieving the perfect crust |
Nice-to-Have Accessories
While not essential, these accessories can make your bread baking better:
- Dough Scraper and Bench Knife: Useful for handling dough.
- Proofing Baskets: Help in shaping and proofing the dough.
- Baking Thermometer: Ensures your oven is at the right temperature.
With these tools and accessories, you’ll be well on your way to baking perfect ciabatta every time.
Our Homemade Ciabatta Bread Recipe: Ingredients Breakdown
The key to a great ciabatta bread is its ingredients. We’ll dive into each one’s role. This is crucial for the perfect homemade ciabatta bread.
The Flour Factor
The flour type is essential for ciabatta. Its protein content affects the bread’s structure and texture.
Bread Flour vs. All-Purpose Flour
Bread flour, with 12-14% protein, is best for ciabatta. It gives the bread strength and chew. All-purpose flour, with 10-12% protein, can also work but might change the texture slightly.
Italian 00 Flour Options
Italian “00” flour, or Caputo flour, is finely milled. It makes the bread tender. It’s perfect for those wanting an authentic Italian taste in their ciabatta.
| Flour Type | Protein Content | Best For |
|---|---|---|
| Bread Flour | 12-14% | Ciabatta, artisan breads |
| All-Purpose Flour | 10-12% | General baking, ciabatta (with adjustments) |
| Italian “00” Flour | 9-11% | Authentic Italian breads, tender crumb |
Yeast Selection
We suggest active dry yeast or instant yeast for our ciabatta recipe. Active dry yeast needs to be rehydrated first. Instant yeast can be mixed with the dry ingredients.
Water Temperature and Quality
Water temperature is key for yeast activation. It should be between 90°F and 100°F. Using filtered water can also enhance the bread’s taste by removing impurities.
Salt and Optional Additions
Salt adds flavor and controls yeast growth. You can also add herbs, garlic, or olives for different tastes.
Mastering the Ciabatta Dough: The Key to Success
Creating the perfect ciabatta starts with mastering its dough. The dough is the base of the bread-making process. It gives ciabatta its airy holes and light texture.
To master ciabatta dough, we focus on two key areas: the biga (pre-ferment) and hydration levels. Let’s explore each to understand their importance and how to get them right.
Creating the Perfect Biga (Pre-ferment)
The biga is a pre-ferment that’s vital for ciabatta’s flavor and texture. It’s a mix of flour, water, and yeast that ferments before adding to the dough.
Biga Ingredients and Ratios
To make a biga, we use 100% flour, 50-60% water, and a small amount of yeast (0.1-0.2% of flour). The exact ratio can change based on the recipe and environment.
Fermentation Time and Temperature
The biga ferments at room temperature (75°F to 78°F) for 12 to 16 hours. This slow process helps develop the bread’s complex flavors.
Understanding Hydration Levels
Hydration level is the water to flour ratio in the dough. Ciabatta’s high hydration is key for its open crumb and tender texture.
Working with High-Hydration Dough
High-hydration dough is sticky and hard to shape. But with practice and the right techniques, you can manage it well.
Adjusting Hydration for Your Environment
The ideal hydration level changes with temperature and humidity. In hot or humid places, you might need to lower the hydration slightly.
Mastering the biga and understanding hydration levels are crucial for making delicious ciabatta at home. These elements help achieve the perfect balance of flavor and texture in this beloved Italian bread.
Step-by-Step Ciabatta Bread Preparation

Making ciabatta bread is all about the details. It starts with creating the biga, a key pre-ferment.
Day 1: Making the Biga
The first step is making the biga. It’s a simple yet patient process.
Mixing and Initial Fermentation
We mix yeast, flour, and water to create a thick batter. This mixture ferments for hours, becoming bubbly and active. This step is vital for the bread’s flavor and texture.
Proper Storage Overnight
After fermentation, we refrigerate the biga overnight. This slows down fermentation, improving the bread’s taste.
Day 2: Mixing the Final Dough
On the second day, we mix the biga with flour, water, salt, and sometimes extra ingredients.
Incorporating the Biga
We mix the biga gently with the other ingredients. Avoid overmixing to prevent a dense loaf.
Achieving the Right Consistency
The dough should be wet and shaggy, like ciabatta bread. Getting the right consistency is key for its texture.
Folding Techniques for Proper Gluten Development
Gluten development is crucial for ciabatta’s airy holes and chewy texture.
Stretch and Fold Method
We use the stretch and fold method to develop gluten. This involves stretching and folding the dough several times during fermentation.
Timing Between Folds
The timing of folds is important. We fold the dough every 30 minutes to an hour, allowing it to relax and redistribute yeast.
| Fold Number | Time | Action |
|---|---|---|
| 1 | Initial Mix | Gently mix ingredients |
| 2 | After 30 minutes | Stretch and fold |
| 3 | After 1 hour | Stretch and fold |
“Bread is the king of the table and all else is merely the court that surrounds the king.”
The Art of Shaping Ciabatta Loaves
Shaping ciabatta loaves is an art that needs patience, skill, and a gentle touch. We’ve mixed and proofed our dough. Now, it’s time to shape it into the characteristic ciabatta form.
Working with Wet Dough
Ciabatta dough is very wet, making it hard to work with. To solve this, flour your work surface well. A light dusting of flour helps prevent the dough from sticking, making shaping easier.
Flouring Your Work Surface
It’s important to use just the right amount of flour on your work surface. Too little, and the dough sticks. Too much, and you’ll get a dense, floury crust.
Handling Without Deflating
When shaping, handle the dough gently. Use a light touch to shape it without pressing too hard. This helps keep the dough airy and prevents it from deflating.
Creating the Signature Ciabatta Shape
The ciabatta shape comes from dividing the dough and using specific shaping techniques. Let’s explore these steps.
Dividing the Dough
To make individual loaves, divide the dough into equal parts. This step is key for uniform ciabatta loaves.
Final Shaping Techniques
After dividing, stretch and fold the dough to create the ciabatta’s characteristic holes and texture. This requires a delicate touch to keep the air pockets in the dough.
| Shaping Technique | Description | Tip |
|---|---|---|
| Gentle Stretching | Stretch the dough gently to create length. | Be cautious not to overstretch, which can tear the dough. |
| Folding | Fold the dough to create layers and texture. | Use a light touch to avoid deflating the dough. |
| Shaping into Ciabatta Form | Form the dough into the characteristic ciabatta shape. | Keep the shaping gentle to preserve air pockets. |
Proofing Your Ciabatta: Timing and Techniques
To get the perfect ciabatta, knowing how to proof is key. Proofing lets the dough rise, which changes its texture and taste. Using the right proofing methods can turn a ciabatta into a light, airy treat or a dense, flat one.
Signs of Properly Proofed Dough
A good ciabatta dough will show certain signs. Visual checks and the poke test are great ways to see if it’s ready.
Visual Cues to Look For
Look for a dough that has grown to double its size. It should have big bubbles on the surface. The dough’s surface should be smooth and a bit shiny.
The Poke Test
Use your finger to gently poke the dough. If it springs back slowly and leaves a small dent, it’s ready. If it springs back fast, it needs more time.
Common Proofing Mistakes to Avoid
Even skilled bakers can make proofing mistakes. Knowing these common errors can help save your ciabatta.
Overproofing Issues
Overproofing can make your loaf flat and lose its structure. Keep a close eye on your dough to prevent overproofing.
Underproofing Problems
Underproofing makes bread dense and heavy. Make sure your dough proofs enough to get the lightness you want.
“The art of bread making is not just about following a recipe, it’s about understanding the process.”
, a saying that many bakers find true. Proofing is an art that needs patience and practice.
Baking the Perfect Ciabatta Loaf
The moment of truth in ciabatta baking comes when you put your loaf in the oven. Baking ciabatta to perfection requires a combination of the right oven setup, creating steam, and knowing when your bread is done.
Oven Setup and Temperature
Preheating your oven correctly is crucial for baking ciabatta. Ensure your oven is at the right temperature before you start baking.
Preheating Your Baking Surface
Preheat your baking stone or baking steel in the oven. This helps in achieving a crispy crust.
Temperature Settings and Adjustments
Set your oven to 450°F (230°C). If you have a convection setting, use it as it helps in even baking.
Creating Steam for the Perfect Crust
Steam is essential for creating a crispy crust on your ciabatta. There are two effective methods to achieve this:
Water Pan Method
Place a pan of water on the bottom rack of your oven while baking. As the water heats up, it creates steam.
Spray Bottle Technique
Alternatively, you can use a spray bottle to mist the oven walls and the bread with water during the initial baking phase.
| Method | Description | Effectiveness |
|---|---|---|
| Water Pan Method | Creates steam throughout the baking process | High |
| Spray Bottle Technique | Provides an initial burst of steam | Medium |
How to Tell When Your Bread is Done
Determining if your ciabatta is perfectly baked involves checking its internal temperature and appearance.
Internal Temperature Check
The internal temperature of a perfectly baked ciabatta should be around 205°F to 210°F (96°C to 99°C).
Sound and Appearance Tests
A well-baked ciabatta will sound hollow when tapped on the bottom. It should also have a golden-brown crust.
Troubleshooting Common Ciabatta Problems
When making homemade ciabatta, we sometimes face common issues. These can include dense bread, flat loaves, and crust problems. We’ll look at these problems and offer solutions to help you make the perfect ciabatta.
Dense Bread Without Air Pockets
A dense ciabatta without air pockets can be a letdown. This usually happens if the dough doesn’t proof enough or if it’s over-mixed. Make sure to let the dough proof well and mix it gently to keep the air bubbles.
Jeffrey Hamelman, a well-known baker, says, “The secret to a light, airy crumb is in how you handle the dough.”
Flat Loaves That Won’t Rise
Flat loaves can come from old yeast, wrong oven temperature, or not enough proofing. Check your yeast’s expiration date and make sure your oven is right. Also, keep your dough in a warm, draft-free place.
Remember, “A good baker is always patient,” and patience helps your dough rise right.
Crust Issues and Solutions
Crust problems, like a too hard or too soft crust, can be fixed by changing how you bake. For a crisper crust, bake it longer or at a higher temperature. For a softer crust, bake it less or at a lower temperature.
“The crust is the crowning glory of any artisan bread,” says
, a celebrated bread expert.
Trying steam while baking can also improve your crust’s texture.
Delicious Variations of Traditional Ciabatta
Ciabatta is a versatile bread that can be made in many ways. You can add savory herbs or use whole grains. This lets you make unique loaves that everyone will love.
Herb and Garlic Ciabatta
Herbs and garlic can make your ciabatta taste amazing. Mix in minced garlic and chopped herbs like rosemary or thyme. It’s great with olive oil and soups.
Tips: Don’t overdo the garlic. Adjust the herbs to your liking.
Whole Wheat Ciabatta
Whole wheat ciabatta is a healthier choice. Use some whole wheat flour instead of all-purpose. But remember, whole wheat flour soaks up more water, so adjust the dough’s moisture.
| Flour Type | Water Absorption | Taste |
|---|---|---|
| All-Purpose Flour | Moderate | Mild |
| Whole Wheat Flour | High | Nuttier |
Olive and Rosemary Ciabatta
Olive and rosemary ciabatta is full of flavor. Mix in chopped olives and rosemary leaves. It’s great with Mediterranean dishes.
These ciabatta variations offer a wide range of tastes and textures. You can try something savory or healthier. There’s a ciabatta for every taste.
Serving Suggestions for Your Freshly Baked Ciabatta

Ciabatta is great for many dishes. It’s perfect for traditional Italian pairings or new sandwich ideas. We’ve got you covered.
Classic Italian Pairings
Ciabatta is a key part of Italian food. Pairing it with classic dishes can make your meal better. Here are some great combinations:
Olive Oil and Balsamic Dips
- Mix extra virgin olive oil with minced garlic for a simple yet flavorful dip.
- Pair ciabatta with a rich balsamic glaze for a sweet and tangy experience.
Bruschetta Variations
- Top toasted ciabatta with diced tomatoes, basil, and mozzarella for a classic bruschetta.
- Try a white bean and rosemary bruschetta for a creamy and herbaceous twist.
Creative Sandwich Ideas
Ciabatta’s airy texture and crispy crust are perfect for sandwiches. Here are some creative ideas to get you started:
Italian-Inspired Sandwiches
- Layer prosciutto, arugula, and Parmesan cheese for a salty and refreshing sandwich.
- Combine mortadella, pistachio pesto, and sun-dried tomatoes for a flavorful Italian-style sandwich.
Breakfast and Brunch Options
- Use ciabatta to make breakfast sandwiches with scrambled eggs, bacon, and cheddar cheese.
- Create a brunch masterpiece with ciabatta, avocado, poached eggs, and cherry tomatoes.
Storing and Refreshing Your Homemade Bread
Keeping your homemade ciabatta bread fresh is key. You worked hard to bake it, so you want to enjoy it for a long time.
Short-Term Storage Methods
For short-term storage, keep your ciabatta in a cool, dry spot. Use a paper bag or a bread box to keep it fresh. Plastic bags can make the bread soggy by trapping moisture.
Tips for Short-Term Storage:
- Store at room temperature, away from direct sunlight.
- Use a bread box or paper bag to maintain airflow.
- Avoid plastic bags to prevent moisture buildup.
Freezing and Reheating Tips
Freezing is great for longer storage. Slice the ciabatta first. Then, wrap it tightly in plastic wrap or foil and put it in a freezer-safe bag.
| Storage Method | Duration | Tips |
|---|---|---|
| Room Temperature | Up to 3 days | Use a bread box or paper bag. |
| Freezing | Up to 3 months | Wrap tightly and store in a freezer-safe bag. |
To reheat, thaw at room temperature or warm it in the oven at 350°F (175°C) for a few minutes.
Conclusion: Your Journey to Artisan Bread Mastery
Learning to make homemade ciabatta bread is a rewarding journey. It opens the door to a world of artisan bread baking. With this recipe, you’ve started on a path to making delicious loaves that will wow your loved ones.
Remember, practice is key. Don’t get discouraged by early failures. Each try brings you closer to mastering artisan bread. Try different flavors like herb and garlic or whole wheat to find your favorite.
Share your bread creations with the todorecipes community and friends! We’re eager to hear your thoughts and tips. Check out more recipes on todorecipes and keep baking. With each loaf, you’ll grow more confident in your bread-making skills.